Retail is evolving, and so are its challenges—rising competition, higher costs, and the need for a seamless customer experience. Shoper 9 simplifies retail operations, whether for a single store or a large chain. With Shoper 9 PoS, Shoper 9 HO, and Shoper 9 Distributor, It addresses all point of sale requirements such as billing, discounts and schemes, price management, MIS reporting and also common issues such as data exchange between head office, warehouses and stores —keeping your business efficient and productive.
You can configure alerts to communicate messages for specific events. You can choose from different modes to send alerts to each showroom in a chain of stores to ensure that distance doesn’t break the chain of communication between you showrooms.
Use the Alerts Management feature of Shoper 9 to provide critical information at the right time, i.e., notify price revision or sales promotion at the same time to all the showrooms. Choose a convenient mode of communication from e-mails, SMS, balloon tips, and message boxes. You can also select the type of alert that would call an appropriate user action, based on the severity – categorise alerts into fatal alerts, warnings, and information.
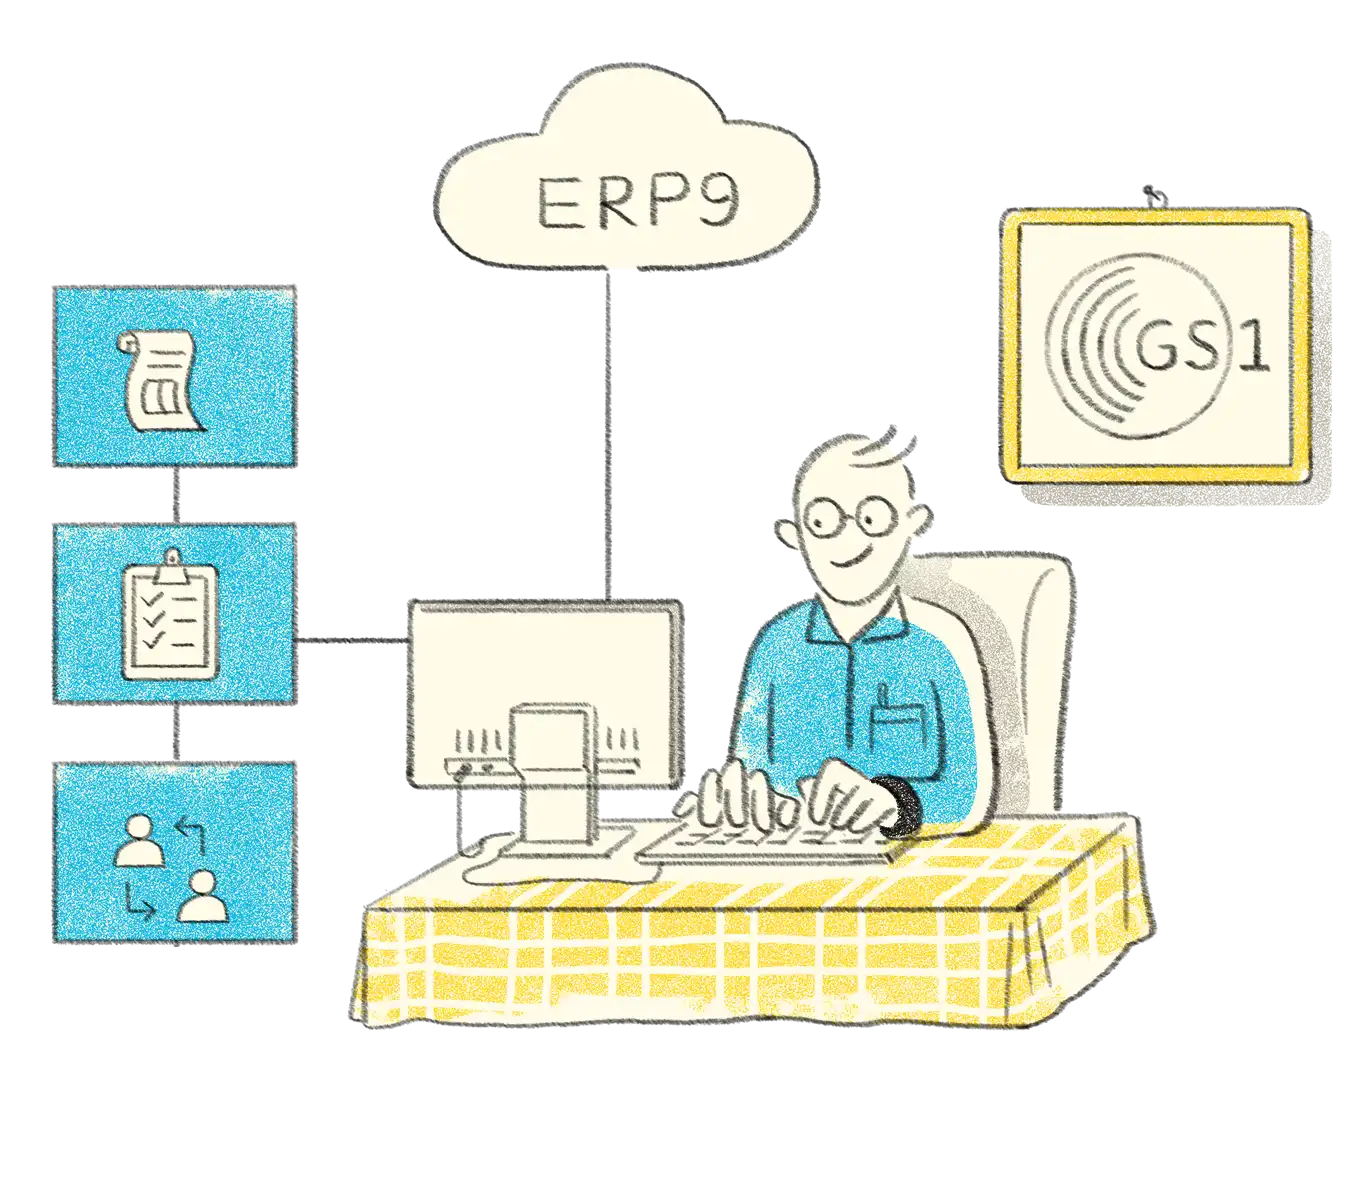
Designed to improve the efficiency of supply chains, the GS1 standards are the most widely-used supply chain standards system in the world.
Shoper 9 allows you to generate the GS1 Standard Numbers for the stock items, based on the Global Trade Identification Numbers (GTIN) assigned to your business. Introduction of GTIN system is of great advantage, especially in case of businesses dealing with international brands or having outlets across the globe.
You can define a pattern or multiple patterns for stock numbering, using pre-defined parameters in adherence to GTIN standards. Adopt GTIN which is the standardized methodology for numbering of items, enabling global trade compatibility and effective stock management.
Tills or POS counters are used to handle sales related operations like billing, return of goods, cancellation, cash receipts, cash payouts, and so on, in a retail outlet. The functionality is quick to enable and easy to use in Shoper 9.
With Till Management, you can set the status of each till to open, lock, unlock, and close, as required, and enjoy complete control over till operations based on the status set. Also, define cash limits for each till reaching, for which an alert will be displayed to initiate cash lift.
Shoper 9 is designed to handle a high volume of SKUs (items) and transactions. Effective and flexible inventory options make inventory management seamless with Shoper 9.
With Inventory Management, you can, generate purchase orders at HO, distributor, and POS, based on business requirements. Import a purchase order or an indent by a POS location using the .xml file sent by another POS location or a Distributor
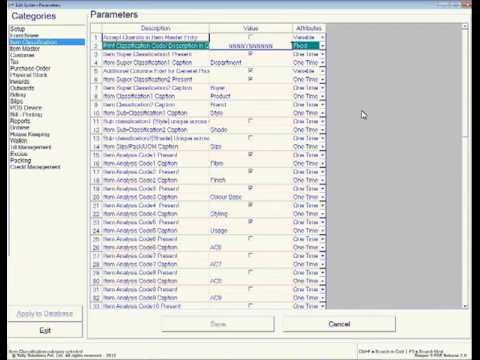
Manage large volumes of your retail business data using catalogues and appropriate business regulations. Catalogues hold business data like products, supply chain network, stores, configurations, and data communication schedules.
Use the centralized sales person management to boost the efficiency of HO and have better insights into the performance of sales personnel across showrooms. Clear out non-moving stock by increasing footfalls, sales, and stock turn out. With Catalogue Management, you can pre-define conditions for schemes and discounts in catalogues and automatically or manually apply these in the bills. Also, apply the ‘and’ clause to build exciting promos even with multiple, non-related items.
Using Print Engine, the printing related logic and business logic are separated and generate outputs based on configuration. Print engine gives the flexibility to customise business logic according to business needs, and also enables configuring printing instructions for all transactions or nodes through the engine.
With Shoper 9’s Print Engine, you can,
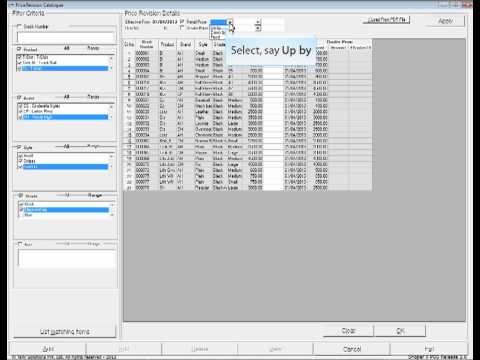
The number of prices you can create for a stock item is unlimited with the comprehensive multi-price capability of Shoper 9. There is complete flexibility to activate or deactivate prices as required. Define multiple prices and select the most appropriate price when recording the transaction.
Managing advance slips, and sales and service orders, are an inbuilt capability of Shoper 9. Link an expected transaction with your billing module to make your billing process faster, hence saving time.
The Predictive Bill Value feature in Shoper 9 enables you to cancel or modify an expected transaction within seconds, generate item level sale promos at the click of a button, reduce billing errors, quickening your billing process, and strengthening customer buying decisions.
Shoper 9 ensures security of all sensitive data. From a single POS store, to chain businesses, Shoper 9 boosts security management with enhanced security controls.
Shoper 9 is built with a flexible framework that manages all exchange of information and materials across your supply chain network. Define business rules at the highest level and extend the same across your network to ensure visibility and control of business operations.
Further more, use Shoper 9 to categorize your business entities geographically. Categorize in order of country, zone, state, city, and finally to the store levels as well. Define statutory and business operation processes for each category or entity. You can also determine and delimit data communication modes and interfaces for data exchanges.
Adopt the Dashboard Report – your one-stop report – for improved visibility on all data synchronisation processes. With Shoper’s comprehensive data synchronisation, you now have access to simplified, consolidated data and store-wise data management. Identify pending POS information and display day status’ after your last synchronisation.
Hardware
Hardware required for successful installation of Shoper 9 depends on various factors that include inventory size and volume of transactions recorded. Refer the following table for more.
Server (HO)
| Particulars | Recommended Configuration |
| Processor | Intel Xeon 3 GHz or greater |
| RAM | 2 GB (4 GB for more than 50 Stores) |
| Hard Disk space | 160 GB |
| Backup device | DAT Drive |
| Network | 100 Mbps, Switched |
Server (HO)
| Particulars | Recommended Configuration |
|---|---|
| Processor | Intel Xeon 3 GHz or greater |
| RAM | 2 GB (4 GB for more than 50 Stores) |
| Hard Disk space | 160 GB |
| Backup device | DAT Drive |
| Network | 100 Mbps, Switched |
Server (POS)
| Particulars | Recommended Configuration |
|---|---|
| Processor | Pentium D, 2.4 GHz |
| RAM | 512 MB (Server with MSDE) 1GB (Server with SQL Server) 2GB (Server with SQL 2005 Std/Enterprise/Express Editions) |
| Hard Disk space | 160 GB |
| Backup device | DVD-Writer |
| Network | 100 Mbps, Switched |
| Printer | TVS MSP 240/250 or Epson LX 300+ (Parallel Port, DMP) |
Client (HO & POS)
| Particulars | Recommended Configuration |
|---|---|
| Processor | P-IV 1.8 GHz |
| RAM | 512 MB |
| Hard Disk space | 40 GB |
| Network | 100 Mbps, Switched |
| Printer | TVS MSP 240/250 or Epson LX 300+ (Parallel Port, DMP) |
Devices Supported
Dedicated to enhance your billing experience, Shoper 9 is compatible with and supports various input/output devices, and POS machines. It can also be customized to support new devices and models. Be it dynamic customer display units, electronic cash drawers, magnetic card readers, and even barcode scanners, Shoper 9 supports it all, reducing your retail office space. You can also use portable data terminal devices, to enter stock data wirelessly. Print receipts, slips, and barcodes.
Architecture
Shoper 9 encompasses Shoper 9 HO and Shoper 9 POS to meet all your requirements from a single retail store to an extensive retail network. Install Shoper 9 HO at your head office or primary control center to monitor all Shoper 9 POS installed at each retail and distribution center.
With Shoper 9 architectural flexibility you can,
Customisation
Shoper 9 Retail Solutions can be customised by Tally Integrators to meet specific requirements. Catering to the constantly evolving business needs, Shoper 9 is packaged with a customisation framework designed to ensure easy handling of database connection and common features.
Interfaces
Eliminate the need to recreate data for external applications. With Shoper 9’s flexible and configurable interface frameworks, share and receive data from applications like SAP, Tally.ERP 9, and other custom/legacy softwares, in the required format. (.txt, .csv files, HTML, XML and spreadsheet formats).
HO supports centralised management of indents from the store, generation of consolidated Purchase Orders and integration with warehouses.
Shoper 9 POS is a powerful Point of Sale (POS) software to manage all your retail operations in a store or distributor location.
Choose from three product editions - Silver, Gold, and Diamond - based on your business type and requirement.


CA Payal Jain
Kaloti and Lathiya Chartered accountants Bhilai – Chhattisgarh

As a practicing Chartered Accountant, I’ve been using **Tally Prime** for several clients’ accounting and GST compliance requirements over the past few years. Tally has proven to be one of the most dependable tools for managing day-to-day bookkeeping, preparing GST returns, and ensuring accuracy in compliance

CA Swarnim Rai
M/s R Rishi and Associates Bhopal, MP
With Tally Prime’s direct GSTR‑1 upload feature, our compliance time has shrunk dramatically. Before switching to Tally Prime’s GSTR-1 upload workflow, our team manually exported data, logged into the portal, uploaded files, checked for rejections, and handled correction loops—and it consumed half a day every month. What once took a half-day now takes only an hour. Highly recommend this to any business using Tally for GST filing.

CA Uttam Chand
CNK Associates LLP, Mumbai – Heading the Chennai Branch
TallyPrime now helps in filing various returns and reconciling all the GST returns filed with tally data, like GSTR3B, GSTR1, 2B v/s Input claimed, 2A v/s Input claimed, IMS direct upload, etc. with so much ease.

CA Sridhar Andhavarapu
Chairman, ICAI- Vizag Branch
Another amazing feature “Upload GST Returns” in TallyPrime- Upload the GSTR-1 directly to the GST portal without login to the portal, which can then be previewed and filed using EVC or Digital Signature Certificate (DSC).

CA Chandrakant Sarode
Chandrakant Sarode & Associates
TallyPrime now matches the GST portal format perfectly - helps avoid upload errors.

CA Chetan Kishor Joshi
With the latest TallyPrime update, we were able to file GSTR-1 more confidently without rechecking exports.

CA Ashish Kanabar
A B Kanabar and Associates
I recently filed GSTR-1 seamlessly through TallyPrime. It significantly helped reduce manual labour & save precious time!

Urmi Patel
Bajaj Electricals
TallyPrime simplified our distribution network, making billing, data integration, and supply chain management effortless, saving us time and improving efficiency across 1000 distributors.

Mr. Chandrasekhar
Mohan & Chandrashekhar CA Firm
TallyPrime has transformed our accounting and client services by automating processes, enabling remote access, and ensuring error-free bookkeeping and compliance. You can run a business without a machine, but not without TallyPrime.

Ramesh Narendran
Geetha Enterprises
TallyPrime keeps key data - landing costs, stock status, and movement analysis—right at my fingertips, anytime I need it.

Simran R Mansukhaani
Tainwala Chemicals & Plastics Ltd
TallyPrime is really a boon to the accounting fraternity. As a chartered accountant I feel it has made the life easier for everyone.

Andrian Harley
Doremi
TallyPrime has been very helpful when it comes to financial reports and managing multiple godowns. We can check stocks in real-time for all our warehouses.

Mr. L.N.A Thomas John
A. Periathambi Chettiar Firm
Tally keeps our business compliant and up to date, making GST filing and e-way bill generation effortless.


Shoper 9 is ideal for retailers of all sizes, from standalone stores to large retail chains, helping them manage billing, inventory, and business insights efficiently.

Enterprise retail solution for all sizes of retail businesses
41628
+ 18% GST (₹135)
41628
+ 18% GST (₹135)
41628
+ 18% GST (₹135)